
티스토리 뷰
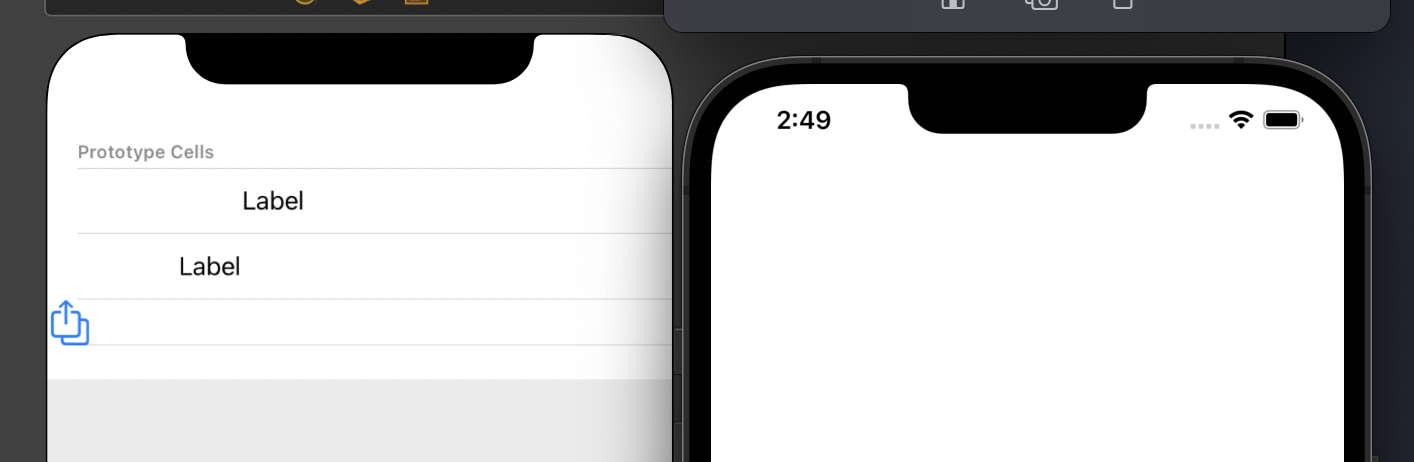
UITableViewController vs UIViewController에 tableView 추가
-> UITableViewController는 루트뷰가 테이블뷰이지만, UIViewController는 UIView
-> 겉보기에는 차이가 없음
-> 화면에 테이블뷰만 들어있을때는 UITableViewController가 디자인하기 더 편하지만, 화면을 자유롭게 구성하고싶다면 UIViewController에 테이블뷰를 추가하는게 더 나음
-> Connection inspector를 보면 UITableViewController는 dataSource와 delegate가 자동으로 연결되어있고 tableView가 지울 수 없는 요소이지만, UIViewController에 테이블뷰를 추가하면 따로 dataSource와 delegate를 연결해야하고 tableView도 지울 수 있다.
UITableView
content
- Static Cells
-> 코드를 작성하지않아도 스토리보드에서 구현한 것 그대로 보여짐
-> 만약 numberOfSections나 numberOfRowsInSection 메서드가 구현되어있다면 코드대로 출력(코드를 우선으로 인식하는 듯)

- Dynamic Prototypes
-> 코드를 작성해야 테이블뷰가 그려져 화면에 보여짐
-> 셀의 개수, 셀의 디자인과 데이터를 나타내는 필수메서드 두 가지를 구현해야함. (numberOfsections는 필수는 아님)
위 사진의 주석에서 알 수 있듯이, dynamic으로 구현하는 경우엔 반드시 아래의 두 가지의 메서드를 작성해줘야함.

numberOfRowsInSection은 하나의 섹션안에 몇 개의 셀을 넣을건지, cellForRowAt은 셀의 디자인과 데이터를 넣는 메서드.
아래의 코드로 세 개의 섹션, 섹션당 세 개의 셀을 갖도록 해봄.
override func numberOfSections(in tableView: UITableView) -> Int {
    return 3
}

override func tableView(_ tableView: UITableView, numberOfRowsInSection section: Int) -> Int {
    // #warning Incomplete implementation, return the number of rows
    return 3
}
override func tableView(_ tableView: UITableView, cellForRowAt indexPath: IndexPath) -> UITableViewCell {

    let cell = tableView.dequeueReusableCell(withIdentifier: "myCell")!

    cell.textLabel?.text = "바보"

    return cell
}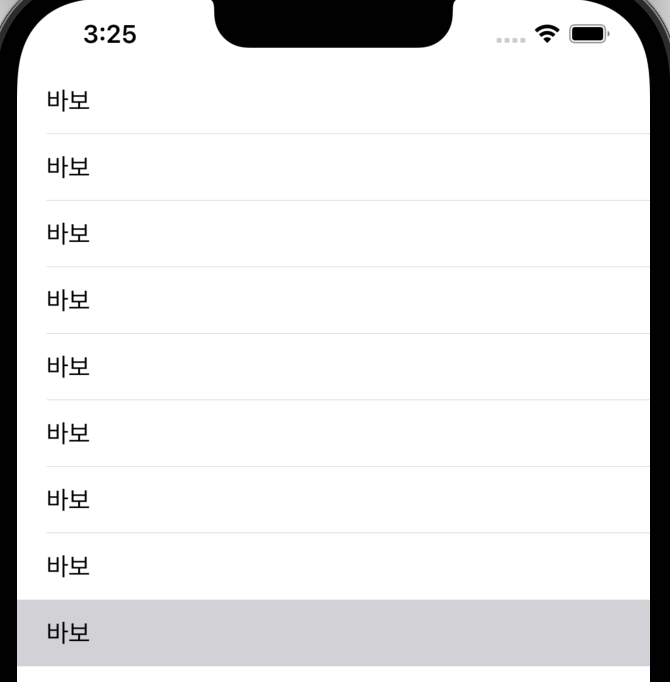
섹션 당 세개의 셀이 들어가 총 9개의 셀이 만들어진 것을 볼 수 있음.
dequeueReusableCell을 이용해 myCell이라는 identifier를 갖는 재사용 가능한 셀을 리턴함.
-> 화면에 보이지 않는 셀을 재사용해 보여질 셀을 구성함.
-> 셀이 너무 많은 경우에 하나하나 만들기 어렵기때문에 재사용하는것임.(메모리)
아래의 두 가지 메서드를 이용해 Header와 Footer 표현
override func tableView(_ tableView: UITableView, titleForHeaderInSection section: Int) -> String? {
    return "나는"
}
override func tableView(_ tableView: UITableView, titleForFooterInSection section: Int) -> String? {
    return "아니다"
}
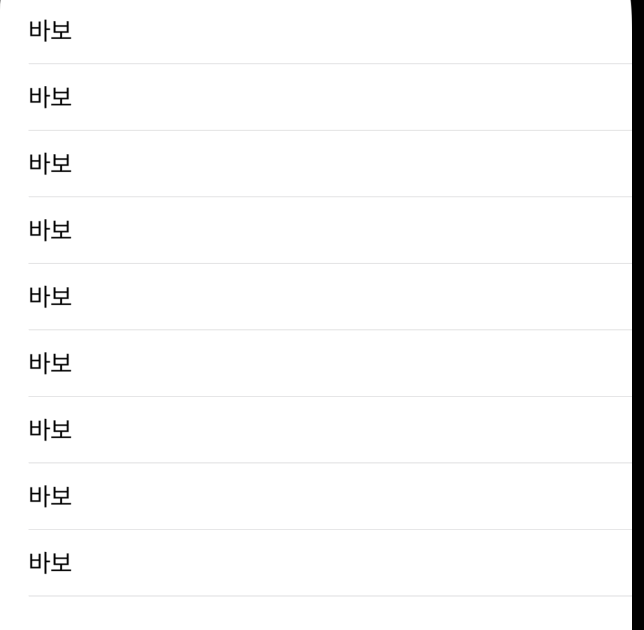
이전에 셀만 보여졌을때는 섹션이 세 개인게 티가 안났는데 이제는 티가남.
테이블뷰에는 세 가지 Style있음.


Seperator를 none으로 한다면 위에서 보이는 회색줄이 사라지게됨.
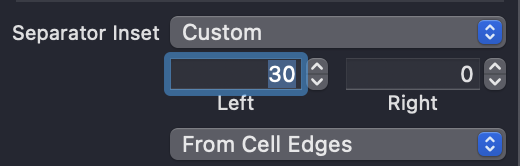
Seperator Inset도 따로 조절할 수 있음. 회색줄의 왼쪽, 오른쪽 여백을 설정.
UITableViewCell
테이블뷰의 Content가 Static인 경우 셀에서 스타일을 정할 수 있음.
Basic

image - title -------------Accessory 구조로 되어있음.
Right Detail
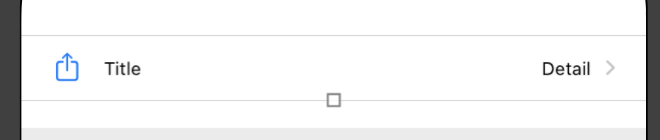
image - title -------------Detail-Accesory 구조
Left Detail

title - Detail-------------Accesory 구조
이미지가 없음.
Subtitle

image - title -----------Accesory 구조
- Detail
위의 네 가지말고 Content Configuration Style도 있음.
-> iOS 13 이상부터 가능.
Selection
-> None이어도 선택은 됨. 단지 색만 안변할뿐임.
-> default나 gray는 회색으로 바뀜
코드로 테이블뷰 구성해보기
섹션 3개, 섹션당 셀 6개, 각 섹션별로 Header 다르게 설정, 섹션별로 셀의 텍스트 설정

    override func numberOfSections(in tableView: UITableView) -> Int {
        return 3
    }

    override func tableView(_ tableView: UITableView, numberOfRowsInSection section: Int) -> Int {
        // #warning Incomplete implementation, return the number of rows
        return 6
    }

    override func tableView(_ tableView: UITableView, cellForRowAt indexPath: IndexPath) -> UITableViewCell {

        let cell = tableView.dequeueReusableCell(withIdentifier: "myCell")!

        if indexPath.section == 0 {
            cell.textLabel?.text = "바보"
        } else if indexPath.section == 1 {
            cell.textLabel?.text = "천재"
        } else if indexPath.section == 2 {
            cell.textLabel?.text = "윤희철"
        }

        return cell
    }
    override func tableView(_ tableView: UITableView, titleForHeaderInSection section: Int) -> String? {
        if section == 0 {
            return "희철"
        } else if section == 1 {
            return "윤희"
        } else if section == 2 {
            return "짱짱"
        } else {
            return "호오오오"
        }
    }
위의 코드를 하나씩 확인해보자.
numberOfSections에 3을 반환해줌으로써 세 개의 섹션을 만듦
numberOfRowsInSection에 6을 반환해줌으로써 섹션당 여섯개의 셀을 설정함.
cellForRowAt에서 셀을 디자인함.
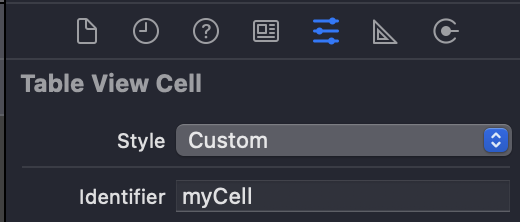
-> UITableViewCell 타입을 반환해야하므로 UITableViewCell 인스턴스를 만들어줌.
-> 스토리보드에서 셀의 identifier를 설정한 뒤 코드를 작성해야함.
-> indexPath는 구조체로 row와 section을 프로퍼티로 갖고 있음. 그래서 indexPath.section으로 섹션에 접근한 것임.
titleForHeaderInSection에선 section을 매개변수로 받기때문에 바로 접근해서 섹션 별로 정해줄 수 있었음.
indexPath를 이용해서 섹션별로 셀의 title을 다르게
indextPath는 section과 row를 갖고 있다고했음. indexPath.row는 섹션마다 0부터 시작하는 인덱스라고 생각하면 편함.
-> 즉, indexPath.section이 0일때 6개의 셀이 있으므로 indexPath.row는 0부터 5까지 있는 것임. 근데 이게 다음 섹션에서도 0부터 시작함.
아래의 코드를 보면 대충 이해할 수 있음.

indexPath.row와 arr의 인덱스가 동일하므로 위의 코드를 한줄로 바꿀 수 있음.
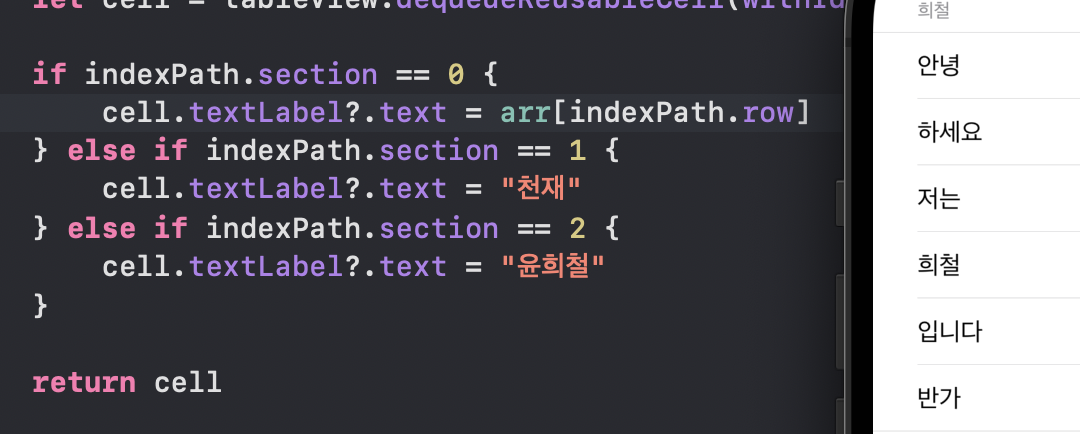
(arr는 클래스 안에 따로 생성해둔 변수)
cellForRowAt이 셀을 디자인하는 메서드라고 했음.
그렇다면 따로 UITableViewCell 클래스를 만들어서 IBOutlet으로 UI를 설정할 수 있을 것 같았음.
_____________________________________________________________________________________________________
과제로 만든 테이블뷰
case 1
스토리보드로만 만듦

-> 셀의 backgroundColor를 No color로 설정해야 다크모드 적용됨.
-> 모드 설정에서 방해 금지 모드, 수면, 개인 시간은 cell의 style이 Right Detail이고 업무는 Subtitle임.
-> 모든 기기에서 공유 칸에서 스위치를 넣기 위해 Style을 Custom으로 바꾸고 위 셀들의 height와 똑같이 설정.
-> 맨 위의 타이틀은 네비게이션 컨트롤러를 임베드하여 설정
case 2
코드로만 만듦

import UIKit

class SettingTableViewController: UITableViewController {

    let whole = ["공지사항", "실험실", "버전 정보"]
    let personal = ["개인/보안", "알림", "채팅", "멀티프로필"]
    let other = ["기타"]

    override func viewDidLoad() {
        super.viewDidLoad()


    }

    override func numberOfSections(in tableView: UITableView) -> Int {
        return 3
    }

    override func tableView(_ tableView: UITableView, numberOfRowsInSection section: Int) -> Int {
        if section == 0 {
            return 3
        } else if section == 1 {
            return 4
        } else if section == 2 {
            return 1
        } else {
            return 0
        }
    }

    override func tableView(_ tableView: UITableView, cellForRowAt indexPath: IndexPath) -> UITableViewCell {
        let cell = tableView.dequeueReusableCell(withIdentifier: "cell")!

        cell.textLabel?.font = UIFont.systemFont(ofSize: 13, weight: .medium)

        if indexPath.section == 0 {
            cell.textLabel?.text = whole[indexPath.row]
        } else if indexPath.section == 1 {
            cell.textLabel?.text = personal[indexPath.row]
        } else if indexPath.section == 2 {
            cell.textLabel?.text = other[indexPath.row]
        }

        return cell
    }
    override func tableView(_ tableView: UITableView, titleForHeaderInSection section: Int) -> String? {
        if section == 0 {
            return "전체 설정"
        } else if section == 1 {
            return "개인 설정"
        } else if section == 2 {
            return "기타"
        } else {
            return "없음"
        }
    }
}
_____________________________________________________________________________________________________
카카오톡 친구 화면을 간단하게 구현해봄.
위에서 말했듯이 따로 UITableViewCell 클래스를 만들어서 IBOutlet을 통해 cellForRowAt에서 값을 넣어보기로함.
import UIKit

class FriendsTableViewController: UITableViewController {

    var friendName = ["가나다", "바보", "희희", "윤희철", "천재", "짱짱", "다라마", "우영우", "호로호로", "나비", "거북이"]
    var message = ["안녕하세요", "저는", "윤희철", "입니다.", "잘", "부탁드려요", "네네", "반가워요", "하하하", "즐겁게 살자", "iOS짱"]
    var img = [UIImage(named: "0"), UIImage(named: "1"), UIImage(named: "2"), UIImage(named: "3"), UIImage(named: "4"), UIImage(named: "5"), UIImage(named: "6"), UIImage(named: "7"), UIImage(named: "8"), UIImage(named: "9")]


    override func viewDidLoad() {
        super.viewDidLoad()


    }

    override func numberOfSections(in tableView: UITableView) -> Int {

        return 1
    }

    override func tableView(_ tableView: UITableView, numberOfRowsInSection section: Int) -> Int {

        return 10
    }

    override func tableView(_ tableView: UITableView, cellForRowAt indexPath: IndexPath) -> UITableViewCell {

        guard let cell = tableView.dequeueReusableCell(withIdentifier: "friendCell", for: indexPath) as? FriendsTableViewCell else { return UITableViewCell() }

        cell.profileImg.contentMode = .scaleToFill
        cell.profileImg.layer.cornerRadius = 15
        cell.nameLabel.font = UIFont.systemFont(ofSize: 18, weight: .regular)
        cell.messageLabel.font = UIFont.systemFont(ofSize: 13, weight: .light)
        cell.messageLabel.textColor = .lightGray

        //섹션이 하나기때문에 indexPath.row만으로도 가능
        cell.profileImg.image = img[indexPath.row]
        cell.nameLabel.text = friendName[indexPath.row]
        cell.messageLabel.text = message[indexPath.row]

        if indexPath.row % 2 == 0 {
            cell.messageLabel.isHidden = true
        }

        return cell
    }
    override func tableView(_ tableView: UITableView, titleForHeaderInSection section: Int) -> String? {
        return "친구 10"
    }
    override func tableView(_ tableView: UITableView, heightForRowAt indexPath: IndexPath) -> CGFloat {
        return CGFloat(60)
    }
}

class FriendsTableViewCell: UITableViewCell {

    @IBOutlet weak var profileImg: UIImageView!
    @IBOutlet weak var nameLabel: UILabel!
    @IBOutlet weak var messageLabel: UILabel!

}
우선 FriendsTableViewCell이라는 클래스를 만들어 객체를 연결해주었다.
cellForRowAt에서 cell을 FriendsTableViewCell 인스턴스로 만들어주었다. 이때, guard문을 사용하여 만약의 상황을 대비했다.
FriendsTableViewCell 인스턴스로 생성했기때문에 프로퍼티에 접근하여 다양한 속성들을 바꿔주었다.
예전에 수업때 배운 내용인 스택뷰에서 하나가 hidden이 되면 그 공간을 채운다는 것을 확인하기 위해 짝수번째 셀의 messageLabel만 hidden시켜주었다.

전체적인 느낌은 비슷하게 만들어진 것 같다.
스택뷰도 공간을 채우기위해 nameLabel이 가운데에 위치해있는 것을 알 수 있다.
'TIL' 카테고리의 다른 글
| [TIL] 2022 / 07 / 20 (0) | 2022.07.21 |
|---|---|
| [TIL] 2022 / 07 / 19 (0) | 2022.07.19 |
| [TIL] 2022 / 07 / 17 (0) | 2022.07.17 |
| [TIL] 2022 / 07 / 16 (0) | 2022.07.17 |
| [TIL] 2022 / 07 / 15 (0) | 2022.07.16 |
- Total
- Today
- Yesterday